15/7/2020 Presenting the second article of the blog series about using open-source tools on Unipi programmable logic controllers. The article focuses on inputs/outputs on Unipi PLCs and working with a 1-Wire temperature sensor.
Introduction
Welcome to the second article from the blog series dedicated to the usage of open-source tools on Unipi programmable logic controllers. In the previous article, we created a bootable microSD card for an Unipi Neuron controller, connected to it and modified a Node-RED demo project. We also described the basic parts of software included in our open-source OS image.
In an absolute majority of applications, the main task of a PLC is to control outputs (actuators) according to information (data) received by inputs. Inputs and outputs are also the main topics of this article. Each Unipi controller features a set of inputs and outputs whose number and combination varies according to the specific model. Extensive projects requiring additional inputs/outputs and/or communication interfaces can utilize Unipi Extension modules
Integrated I/O
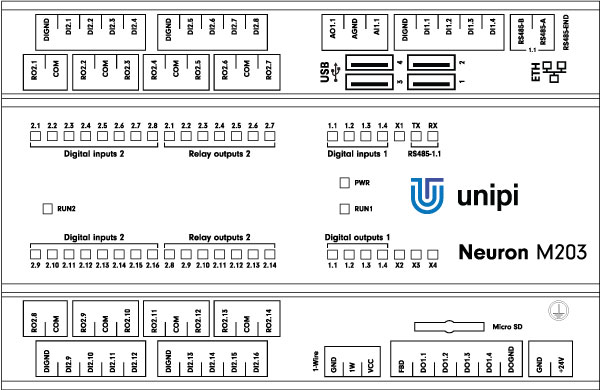
Let’s remind ourselves of input/output types featured on the Unipi Neuron M203 we chose for this series of blog articles.
 Neuron M203 controller
As part of the Neuron M product line, the M203 represents an intermediate model offering a balance between the number of inputs/outputs and compact dimensions. The controller offers the following inputs, outputs and communication interfaces:
| I/O type | I/O number | Special functions |
| Digital inputs | 20 | Counter mode, configurable Debounce, DirectSwitch for direct connection to outputs |
| Digital outputs | 4 | Pulse-width modulation (PWM) |
| Relay outputs | 14 | - |
| Analog inputs | 1 | Voltage or current mode |
| Analog outputs | 1 | Resistance measurement (ie. from resistance thermometers) |
| User LEDs | 4 | - |
| RS485 interface | 1 | Configurable bitrate, parity and number of stop bits |
| 1-Wire bus | 1 | Automatic detection of connected sensors |
Inputs and outputs are placed on the individual I/O boards which communicate with the computing module using the SPI high-speed bus. As the traffic on this bus is controlled by unipi kernel driver in Linux OS, it is NOT POSSIBLE to use standard libraries for GPIO such as pigpio for Python. Luckily there are several alternative methods of accessing the mentioned peripherals:
1) SysFS
The most straightforward access to peripherals using regular file operations. Useful for creating custom software in any language (bash, C/C++, Python, PHP…) without the need for extensions or libraries. At the same time, it is a very easy way of testing input/output basic functionality.
Examples:
- Switching relay output 12 in Group 2 (marked as 2.12):
echo 1 > /sys/devices/platform/unipi_plc/io_group2/ro_2_12/ro_value- Reading the state of binary input no. 1 in Group 1 (marked as 1.01):
cat /sys/devices/platform/unipi_plc/io_group1/di_1_01/di_value2) Modbus TCP server
A standard part of all OS images offered for Unipi controllers. By default the server is configured to accept only local connections within the controller, using port 502. This configuration can be easily changed to enable access from an external device via LAN or through a different port. All you need to do is to edit the etc/defaults/unipitcp file according to provided instructions. Modbus register maps of all controllers and extension modules are available on this link.
Note: For Modbus TCP server we recommend using an already existing module/library for the used programming language (ie. Pymodbus for Python). For quick command prompt-level testing, you can use the mbpoll tool available from the official repository as a .deb package.
Web services
EVOK, an optional set of web service APIs (and a part of the Unipi-developed open API) functioning above Modbus TCP server and enabling access to inputs/outputs via several web service protocols:
- REST - WebForms and JSON formats, support of bulk operations…
- SOAP
- WebSocket (used by the Node-RED system)
- JSON-RPC
EVOK is included in the open-source OS image along with pre-installed Node-RED. It can be also installed into other Debian-based images using the standard package method.
Example of reading temperature via 1-Wire
The pre-installed Node-RED demo project includes a showcase of using digital inputs and outputs. We can use this to demonstrate reading values from a connected DS18B20-based temperature sensor. Bear in mind the following guide assumes the Node-RED OS image we created in the previous article.
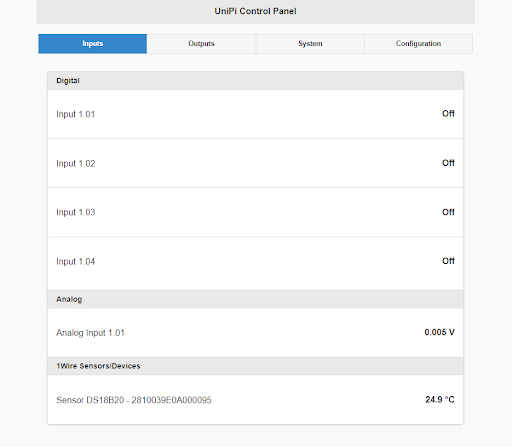
Upon connecting the temperature sensor to the controller enter the controller’s IP address into your browser’s address bar (without port specification). The EVOK control panel will open, serving not only for testing I/O functionality but also for quick configurations. Devices connected via 1-Wire bus are connected automatically, the temperature value should be thus displayed instantly on the panel:

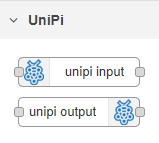
With the basic functionality verified we can now read the value in Node-RED, using the unipi input node included in the provided OS image. Alternatively, you can install it separately from a public repository:
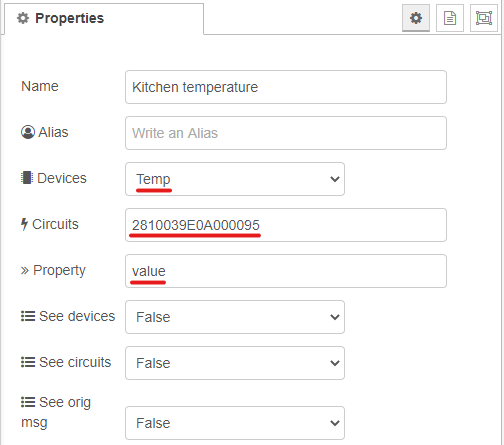
The node has to be configured accordingly:

The Devices field denotes the type of the selected input (binary, analog, temperature). A name of the said input must be entered into the Circuits field. The input’s name matches the 1-Wire temperature sensor’s address, which can be checked via EVOK (see above).
The last important field is Property, which acts as a value filter. The entire output block message contains a lot of auxiliary data and not all of it is always needed.

The first message contains an already filtered value from the value field, while the second value is displayed in its default form created directly by the output block. This value is of Number data type, and we can use it further, such as displaying it on the control panel or sending it to a different device. More detailed info about this topic will be included in one of the future articles and for now, we will use the value only for a very simple project of heating control using temperature with hysteresis:
.png)
The Comparator function block includes a simple implementation of “thermostat” with hysteresis. All values in the code are fixed for better understanding.
----------------------------------------------------------------------------
var setpoint = 28;

var hysteresis = 1;

var current = msg.payload;


if (current >= (setpoint+hysteresis)) {

    msg.payload = false;

} else if(current <= (setpoint-hysteresis)) {

    msg.payload = true;

} else {

    msg.payload = "no change";

}


return msg;
--------------------------------------------------------------------------
Heater denotes the output block controlling relays on the PLCs.
The debug node serves for easy debugging of the program. All you need to do is to connect it with the node you want to debug. To display logged messages just click on the bug symbol in the upper right corner of your screen. :

The example of debugging output generated by this node is shown above (messages from the thermometer block).
Conclusion
In this article, we worked with an external temperature sensor connected via the 1-Wire bus. We also acquainted ourselves with the EVOK’s control panel and we created our first custom function in Node-RED for switching room heating via relay control. In the next article, we will focus on working with external modules communicating via widespread Modbus protocol.


